19 min 4720
MetaMask Wallet Newbie Tutorial
MetaMask wallet newbie tutorial - Installation, Creating Mnemonic, Transferring and Adding Chains.
What is MetaMask Wallet? - The most universal cryptocurrency wallet on the market.
MetaMask is a cryptocurrency wallet that works with web browsers, iOS, and Android and supports blockchains that are compatible with EVM.
The primary purposes of a cryptocurrency wallet, a tool for managing assets on the blockchain, are:
- Generating private keys
- Initiating transactions
- Signing transactions with private keys
It's the secret code that creates your unique blockchain address—the digital equivalent of a bank account number. Once you've got that address, it's your gateway to receiving crypto (like getting paid) and sending it out (like paying a friend). But here's the kicker: your private key doesn't just store your crypto — it's the ignition key for every transaction you'll ever make. Lose it? You lose access to your funds. Share it? Say goodbye to your coins. Guard it like your life depends on it, because in crypto, that key is your power.
MetaMask Function 1: Storing Cryptocurrencies and NFTs
Generating private keys is one of the jobs of a cryptocurrency wallet. The public key is computed by the private key, and the public key is computed from the address.
Only the corresponding private key can be used to access and manage the cryptocurrencies stored in this address.
Possessing a blockchain address with a personal private key enables you to keep different cryptocurrencies and NFTs within it. The assets held at the address can solely be accessed and controlled by the individual possessing the private key, making it crucial to protect the private key carefully.
Note: MetaMask is EVM chain operations-based and has EVM addresses generated, which can be used only to store and hold assets in the same respective blockchain.
Example: Bitcoin isn't an EVM-style cryptocurrency, meaning it can't be directly held in the MetaMask wallet.
MetaMask Function 2: Participating in DeFi Operations
The second and third functions of a cryptocurrency wallet are to initiate transactions and sign transactions with a private key. To utilize the assets at this address, including sending them to another party or engaging with smart contracts, the private key holder must permit these actions..
Decentralized Finance (DeFi) is a decentralized, peer-to-peer financial system. You know, cryptocurrency wallets like the MetaMask wallet are incredibly helpful. They let us easily connect our crypto accounts together and even with those snazzy digital contracts. It's like having a secret handshake for our digital coins, but without the actual handshake part. Super convenient, right? It's like a friendly neighborhood bridge for all your blockchain buddies! For ordinary users, DeFi operations are made possible through the use of these wallets.
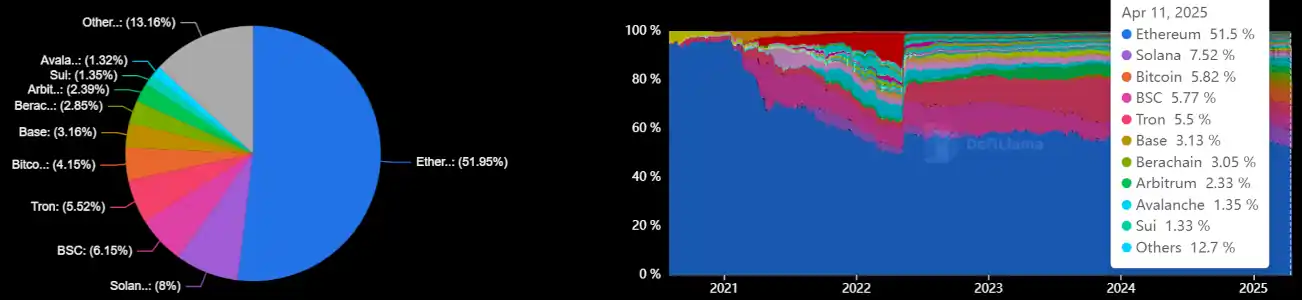
Currently, the most commonly used metric to compare the scale of DeFi is TVL (Total Value Locked). According to data from DefiLlama, Ethereum still dominates the market, accounting for nearly 52% of the total. The remaining 48% is also largely comprised of EVM-compatible chains. Moreover, most DeFi protocols on EVM chains support MetaMask, which means that through the MetaMask wallet, you can access and experience the vast majority of the DeFi world.
MetaMask Function 3: Supporting Cryptocurrency Wallets on Various EVM Chains
One of the distinctive features of MetaMask is its support for EVM-compatible blockchains. In simple terms, if a blockchain is EVM-compatible, you can use MetaMask to store and manage assets on that chain.
EVM = Ethereum Virtual Machine
Ethereum is currently the most popular platform blockchain, allowing for the operation of various smart contracts and DApps on the chain. In general terms, the EVM functions similarly to the operating system of the Ethereum blockchain.
Owing to Ethereum's leading role, numerous newer platform blockchains have opted for EVM compatibility, simplifying the process for developers to build and transition applications. This enables folks to mess around with different blockchain networks using something like a universal remote control, which makes it super easy to get the hang of and doesn't need a PhD to start playing around with it.
Lots of the big names in blockchain town, like BSC, Polygon, and Avalanche, all get along swimmingly with EVM, so you can use it like a VIP pass to hop between them without breaking a sweat.
Through MetaMask, you can manage cryptocurrency assets on these blockchains simultaneously.
MetaMask Introduces MetaMask Snap: Supporting Non-EVM Blockchains
MetaMask, the go-to wallet for all things crypto, dropped the news about MetaMask Snaps on September 12, 2023.
Think of them like the cool add-ons for Chrome that you can get to make your browser do all sorts of fun stuff. These snaps are basically little extras that developers whip up, giving you the choice to bolt 'em onto your MetaMask wallet. What's the deal with these snaps? Well, they're like bridge-builders, letting MetaMask play nice with other blockchain networks that aren't part of the EVM gang, like Cosmos, Solana, and Starknet. And the cherry on top? They give you more ways to tweak your wallet to suit your fancy.
MetaMask Snaps, which can be categorized into three main categories:
- Interoperability: Connecting non-EVM blockchain networks, allowing users to interact with multiple blockchain platforms.
- Transaction Insights: Providing more information about transactions before they are confirmed, giving users a better understanding of the transaction details.
- Notifications: Receiving web3 notifications directly in MetaMask, keeping users informed about important events and updates.
A detailed list of available Snaps can be found on the official website: snaps.metamask.io
In the future, we can expect a delightful explosion of Snaps for users to explore—think of it like an all-you-can-eat buffet of options! Plus, MetaMask is totally on a roll to be besties with more blockchain networks, which is gonna make it super easy for all of us to just chill and test out the crypto scene without getting too crazy about it.
But hold up, it gets better! That MetaMask wallet is about to get all snug and comfy, so you can make it your own little personal haven in the crypto world. It's like customizing your bedroom, but for your digital assets. How cool is that? Imagine customizing your wallet so much that it feels like an extension of your personality — maybe even with a virtual cat that gives you advice on when to invest or hold! The future looks bright and tailor-made for every user's unique style!
Installing the Metamask Wallet
Step 1: Download the Mobile App or Install the Web Browser Extension
For mobile devices, first check which operating system you have (iOS or Android). Then, go to the respective App Store or Google Play, search for Metamask, and download and install it.
Suggestion: Never download and install wallet applications from untrusted sources.
For the computer version, install the browser extension; first, visit the official Metamask website and download.

To get Metamask on your computer, you've gotta head to their actual website and grab the thingy called a browser extension. It's like a little helper for your internet browser. It works with the big guys like Firefox, Chrome, Brave, Edge, and Opera. Basically, it's like installing a new app but for your browser instead of your phone.
Once you've got it, you can set up a new wallet on your computer, which is pretty cool. But here's the kicker: if you've got a mobile phone too, you can totally sync your wallets! So, you make a wallet on one device and then just copy and paste this thing called a mnemonic phrase to the other device, and boom! They're both playing nice together. It's like having the same password for two different accounts, but way more secure and with crypto stuff.
Step 2: Create a New Wallet: Make sure to back up the mnemonic phrase
When you open the App or browser extension for the first time, you will have two options:
- Create a new wallet
- Import an existing wallet
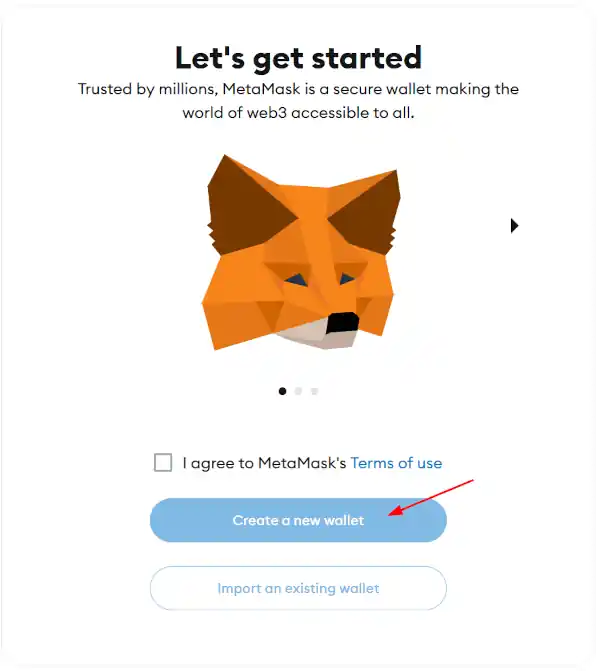
After selecting "Create a new wallet", you will need to set a password. If you are a new user, it is important to understand a key concept: the wallet password is not the private key!
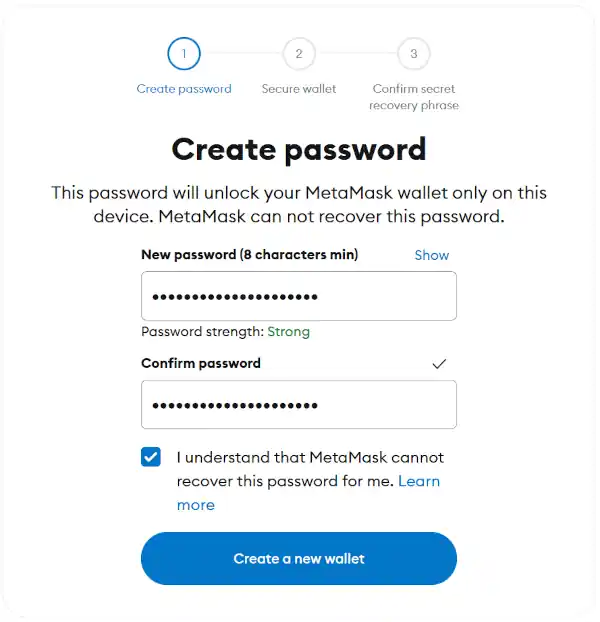
The password established here acts as an extra layer of security. In the future, whenever you wish to access the App or browser extension, you will be required to input the password to unlock and utilize it, stopping others from accessing your wallet without permission. This password is stored on the App or browser.
It is not the private key; the private key is what controls the wallet. The password is just an extra layer of protection on this device.
Losing the private key means losing control of the wallet and being unable to access the assets within it.
Losing the password means just not being able to log into the wallet software on this device. You can still recover the wallet by reinstalling the app or importing the mnemonic phrase on another device.
Tip: Regardless if it's the password or the private key, MetaMask totally doesn't store them for you, okay? So if you lose 'em, you're kinda on your own, buddy. No customer support will magically save you here. So, like, make sure you keep them super safe and maybe write 'em down or something, so you don't get locked out.
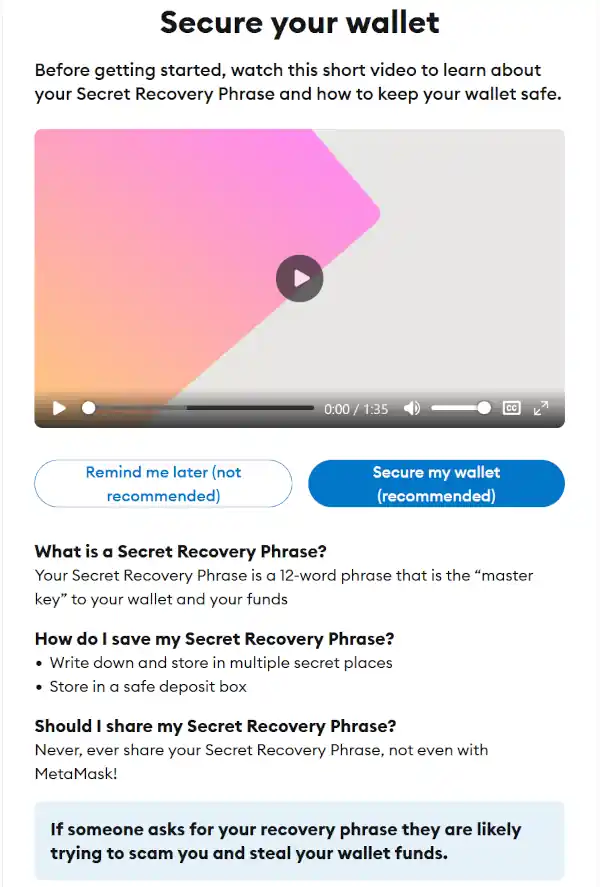
Wallet Security Guidelines: If you're new to this MetaMask game, it's totally a good idea to chill and watch the whole video without fast-forwarding. It's like a crash course in keeping your digital coins safe, and trust me, you don't wanna miss any of the deets.

Back up the mnemonic phrase!
The mnemonic phrase is another representation of the private key. Please make sure to back it up securely.
When you see Congratulations!, it means the wallet has been successfully created. Continuing on will take you to the wallet interface, which is set to the Ethereum chain by default, with the native token being ETH. If you want to operate on other blockchains or with other cryptocurrencies, the next section will provide tutorials on adding tokens and networks.
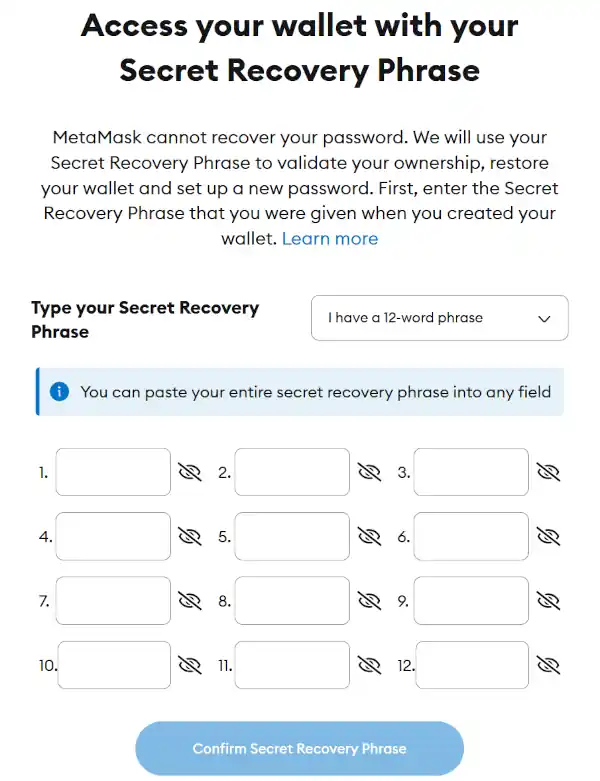
Step 3: Import an Existing Wallet: Import the Mnemonic Phrase
Got a wallet, either a fancy hardware one that works with EVMs or a handy software wallet? And you've got your mnemonic phrase saved someplace safe? Great! Choose "Import an existing wallet" to start managing it with MetaMask.
Remember, you'll need that mnemonic phrase close by for this step. It's like a secret password, so type it in just as you have it saved — the order is super important! After you've done that, you'll be good to go with your MetaMask wallet, which starts you off on the Ethereum chain with good ol' Ether (ETH). But hey, if you want to play with other blockchains or cryptos, you'll need to add tokens or networks to the mix.
Now, let's talk about adding and moving your moolah with MetaMask. First things first, you gotta have some crypto in your wallet to do anything fun. So, you'll need to make a deposit.
But what if you're feeling like withdrawing some funds? No problemo! You can send your assets to an exchange or another wallet address. Just keep in mind, you gotta have some coins in there to get started!
MetaMask Wallet Deposit and Transfer Tutorial
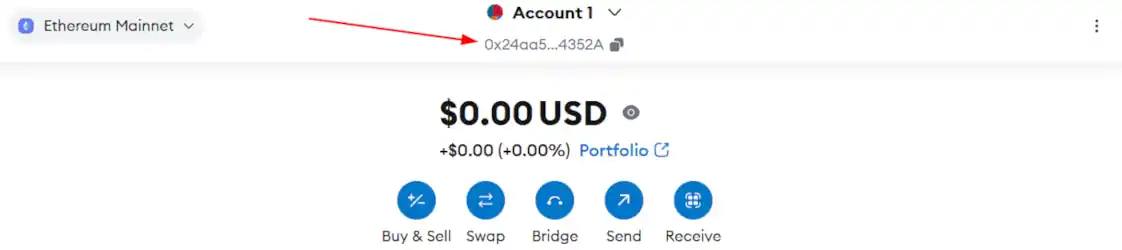
Step 1: Find Your MetaMask Wallet Address
The first important task is to locate your wallet address.
Step 2: MetaMask Transfer Operation
The most basic functions you will use are receiving and sending. Receiving is straightforward; just provide your address to the other party. If you have not received the funds but the other party has sent them, it might be because the token is not displayed by default. You can follow the tutorial on adding tokens in the next section to display it.
The important thing to note here is that the wallet address must be correct. Please confirm it multiple times before sharing it.
If you want to transfer funds to your own wallet, for example, buying tokens on an exchange and then transferring them to your wallet to participate in DeFi operations, first find an exchange where you can buy tokens. Then, follow the exchange's withdrawal tutorial to transfer the tokens to your wallet address. Make sure to check the blockchain and token types supported by the exchange, as well as any withdrawal fees.
Interesting Note:
You will see a string starting with "0x" on the wallet interface; this is your wallet address. The address looks like a random string of characters, so do not try to memorize it or enter it manually. Use the copy-paste function to avoid errors.
An interesting point is that, regardless of the network you switch to, this wallet address will remain the same on all EVM-compatible chains. With this address, you can navigate all EVM-compatible chains. However, note that while the address format is the same, you are actually on different blockchains, similar to having the same room number in different hotels. The rooms are different and not interconnected.
Important Reminder:
If you make a mistake while transferring funds to a bank account, sometimes the transfer will not go through, and sometimes it can be recovered. If you make a mistake while transferring cryptocurrency to the wrong address, you might be able to recover it for a fee if you're lucky. If you're not so lucky, the funds will be lost forever and cannot be recovered.
Step 3: Sending Funds
To send funds, follow these steps:
- Click on the "Send" button in the MetaMask interface.
- Enter the recipient's wallet address. Make sure to double-check the address to avoid errors.
- Enter the amount you want to send.
- Select the token you want to send from the dropdown menu.
- Click "Next" and then "Confirm" to complete the transaction.
- Always double-check the recipient's address and the amount before confirming the transaction to ensure accuracy and avoid mistakes.
If you want to transfer funds out of your wallet, you should first confirm three things:
- Which blockchain is the token on?
- What is the recipient's address?
- Which token do you want to transfer?
After confirming the answers to these three questions, you can proceed with the transfer.
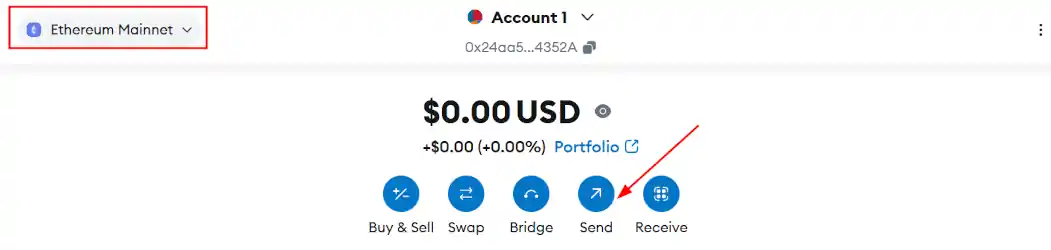
First, switch to the corresponding blockchain, then click "Send"
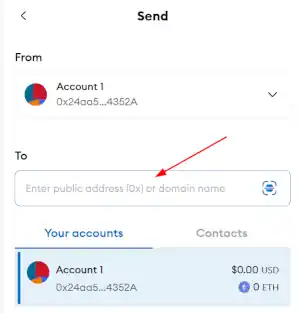
Enter the address. The address is long and looks like a random string of characters, so it is best to use the copy-paste function. Once you have pasted it, be sure to verify it carefully. For addresses that you use often, you can refer to the following tutorial to save them as contacts, eliminating the need to input them manually every time.
Below, you will see the estimated Gas fee calculated by the system. The Gas fee is the transaction fee paid to miners or nodes on the blockchain for performing operations.
If your account balance (including the estimated Gas fee) is insufficient, the transaction cannot be sent. If the token and chain you want to transfer are not the default, you will need to add them manually the first time you use them.
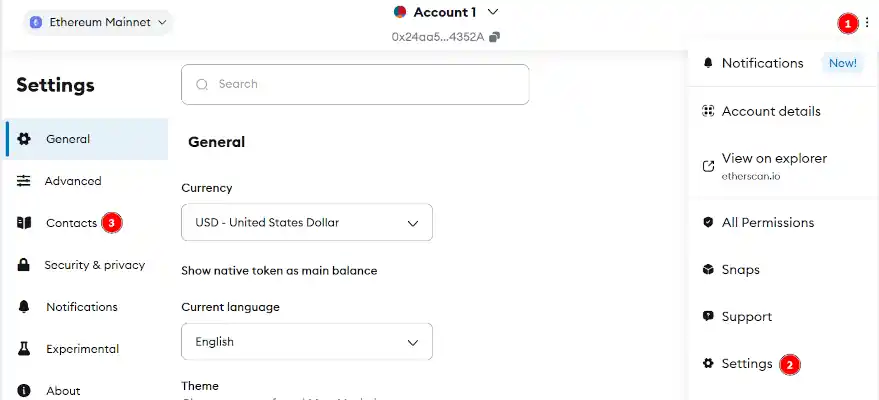
Step 4: Set Up Common Addresses as Contacts
Addresses are long and can be error-prone when copying and pasting. MetaMask has a convenient feature that allows you to set up common addresses as contacts. Once set up, you can select the contact directly in the future without having to re-enter the address each time.
To set up a contact:
- Click on tree dots icon in the MetaMask interface.
- Select "Settings -> Contacts" from the dropdown menu.
- Click on "Add Contact".
- Enter a name for the contact and paste the wallet address.
- Click "Save".
Now, you can select this contact when sending funds, making the process faster and more convenient.
After successfully setting up your contacts, in the future when sending cryptocurrency, you will see a list of your established contacts in the address input field, allowing you to select them directly.
How to Add Networks and Tokens to the MetaMask Wallet?
By "network", we mean different blockchains. MetaMask supports all EVM-compatible chains, but you need to switch between them based on the chain you want to operate on. You can switch networks using the button in the top-right corner. For the first time, you need to manually add the network.
It is recommended to use the Chainlist website (chainlist.org) to add new networks. (When using it for the first time, please ensure the URL is correct!)
Adding a New Network Using Chainlist:
- Visit Chainlist: Go to the Chainlist website.
- Connect MetaMask: Click on "Connect Wallet" and connect your wallet.
- Select Network: Browse the list of networks and select the one you want to add.
- Add to MetaMask: Click on the "Add to MetaMask" button next to the network you want to add.
- Confirm: A popup will appear in MetaMask. Review the network details and click "Approve" to add the network.
By following these steps, you can easily add new EVM-compatible networks to your MetaMask wallet using the Chainlist website.